Photoshop Toolbox
May 14, 2013, by admin
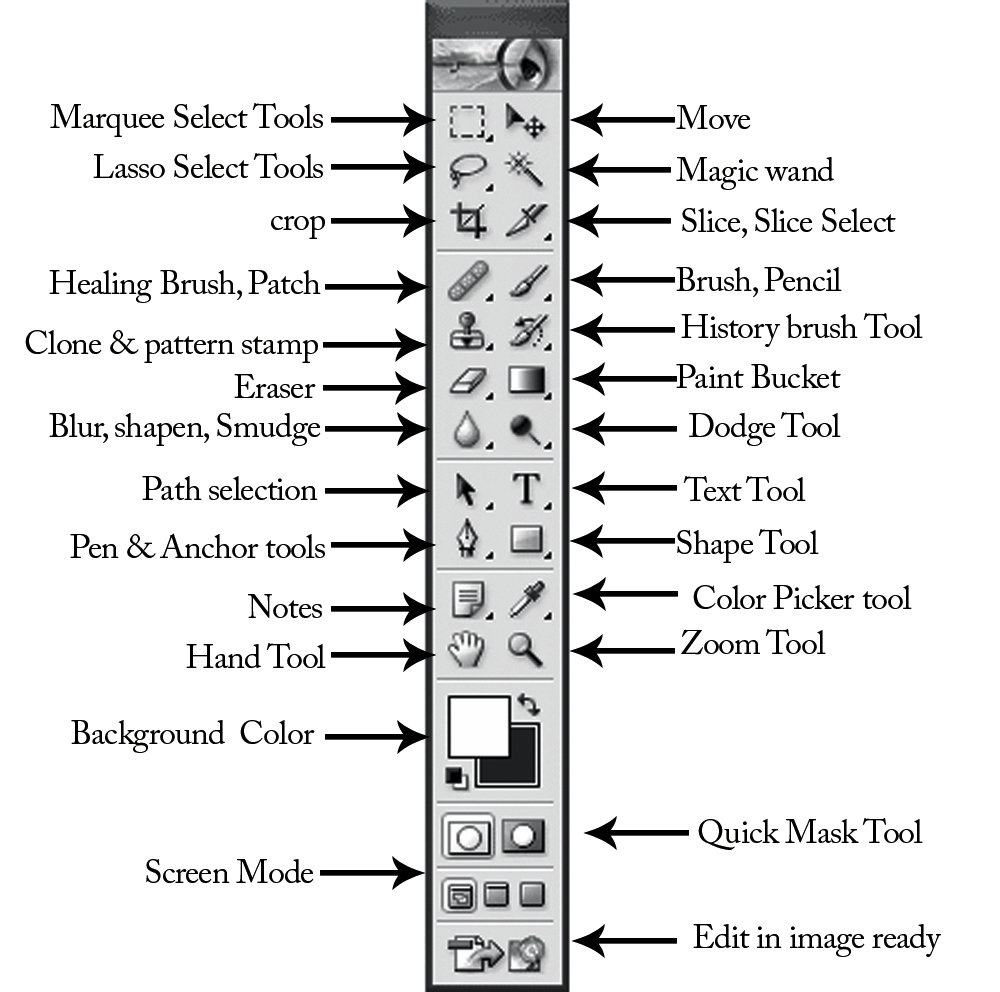
If you like to learn Photoshop for any purpose like photo designing or web designing the basic you should know about the tools in the Photoshop because the tools are the thing which help you to make thing what you liked to do the The Toolbox is a floating palette that contains Photoshop’s primary mouse-controlled tools. These various tools, when activated with a left mouse click, replace the user’s mouse cursor with the selected tool. The user can then use that tool to perform various functions also controlled primarily via the mouse.
Marquee Select Tool :
The marquee Select tools make rectangular marquee tool and Elliptical Marquee Tool,single row, and single column Marquee Tool
Move Tool :
The Move Tool is used to move selections, objects, and layers.
Lasso Select Tool :
There are several Lasso Tools which are used to make irregular selections. There is a polygonal lasso tool for polygon selections, and a magnetic lasso tool which automatically follows edges of objects
Magic Wand Tool :
The Magic Wand tool makes you to selects similarly color areas of an image. The tool is placed near the top of the Photoshop Toolbox
Crop Tool:
Crop tool make once you have preferred an photo area to crop, you do not absolutely have to crop it, and you can alternative, altogether hide the cropped area considerably than permanently deleting it.
Slice Tool:
Slice tool appealing much does what the name intimate; it slices an image into sections. Slice tool most frequently used in web work to make very large images easier to appellation.
Healing Brush Tool:
There are several healing tools in Photoshop which are used to repair imperfections in images, or handle blemishes and red-eye.
Brush Tool:
The brush tool paints brush achievement. Paints hard-edge strokes, replaces definitive colors in your photo or image. You can paint over a destination color with a therapeutic color.
Clone Stamp Tool :
The Photoshop clone stamp tool allows you to copy one area of an image and copy it onto another area
History Brush Tool :
The history brush uses a previous state or snapshot of an image. The tool makes a copy of the image as it was in a previous state, then uses the content of this copy to paint with.
Eraser :
Eraser tool erases pixels and restores parts of an image to a already saved circumstances. It has three variations: Eraser, Background Eraser and Magic Eraser
Paint Bucket :
he paint bucket tool is other very useful tool. To use the paint bucket tool, simply click on the flowing paint bucket icon in the toolbox. It has two variations: paint bucket tool, gradient tool.
Blur Tool :
The Blur tool make blurs hard edges in an image, sharpen tool make sharpens soft edges in an photo or image, smudge tool make smudge data in an photo
Dodge Tool :
Use this tool to lighten dark areas, choose Shadows, Midtones or Highlights and apply an exposure value. Choose an appropriate size brush and paint over the areas to be lightened – be careful not to over apply the strokes otherwise the brushed image area will start to wash out. The default setting is 50%, try a lower value with a soft edged brush for a subtle effect. On the sample picture below, the steam has been lightened.
Path Selection :
The Path Selection* Tool selects and moves (fragments of) existing path’s / vector shape mask’s segments / anchor points
Text Tool :
The Text tool is used to position and enter text into your image. The text may be of any color or font that you have active on your computer. You also have the option to set the text tool to work so that the background color is used for the “fill space” around the text, or if the text will be applied with transparent “fill space”, allowing the image to show through behind the text.
Pen & Anchor Tool :
Photoshop’s pen tool you have three options: Create a new work path, Create a new shape layer, and Fill Pixels.
We will use the Create a new work path option as this the most commonly used. You can find these options in the top left hand corner of the Photoshop window
Shape Tool :
Photoshop gives us six Shape tools to choose from – the Rectangle Tool, the Rounded Rectangle Tool, the Ellipse Tool, the Polygon Tool, the Line Tool, and the Custom Shape Tool, and they’re all nested together in the same spot in the Tools panel. By default, the Rectangle Tool is the one that’s visible in the Tools panel, but if we click on the tool’s icon and hold our mouse button down for a second or two, a fly-out menu appears showing us the other Shape tools we can choose from
Notes Tool :
Like post-it notes, but digital. You can use this tool to add small little note boxes to your image. These are useful if you’re very forgetful or if you’re sharing your Photoshop file with someone else. I’m pretty sure it only works with .PSD files.
Eyedropper Tool :
This tool works by changing your foreground color to whatever color you click on. Holding the [Alt] key will change your background color.
Hand Tool :
You can really make short work of your job with the Hand Tool. It’s for moving your entire image within a window. So if you’re zoomed in and your image area is larger than the window, you can use the Hand Tool to navigate around your image. Just click and drag. You can get to this tool at any time when using any other tool by pressing and holding the [Spacebar].
Zoom Tool :
Pretty obvious what this tool does. It allows you to zoom into your image. Don’t be dumb, it doesn’t actually change the size of your image. Hold the [Alt] key to zoom out. Holding the [Shift] key will zoom all of the windows you have open at the same time. Double-click on the Zoom Tool in the palette to go back to 100% view.

